Last update: 31-03-2025
Acrelia's “Multiple Send” functionality allows you to schedule a campaign to be sent to multiple lists/segments of your sub-accounts. This way, if you have to send a statement to the lists of, for example, several departments or headquarters of your company, you can do it comfortably without having to create a new campaign in each sub-account or access each of them to schedule the sending. .
Below we show you the steps to configure a “Multiple Send”.
1. Selection of the campaign to send
2. Email sending settings
3. Sending or scheduling
4. Monitoring of sendings
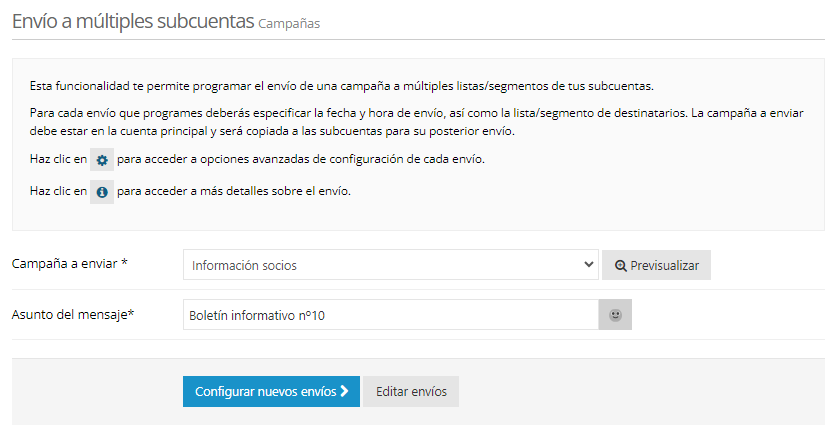
Go to "Settings" - "Subaccounts" and click on the "Multiple Sending" section. The first step you must take is to choose the campaign you want to send in the “Campaign to send” drop-down menu. Once selected, the subject will be filled in automatically and you can edit it if necessary.
In this first section, you will also have the option to preview the campaign you will send by clicking on “Preview”. Once you have it ready, click on “Set up new sends”.

If what you want is to edit a “Multiple Submission” that you left halfway (and previously saved), you must click on the “Edit Submissions” button.
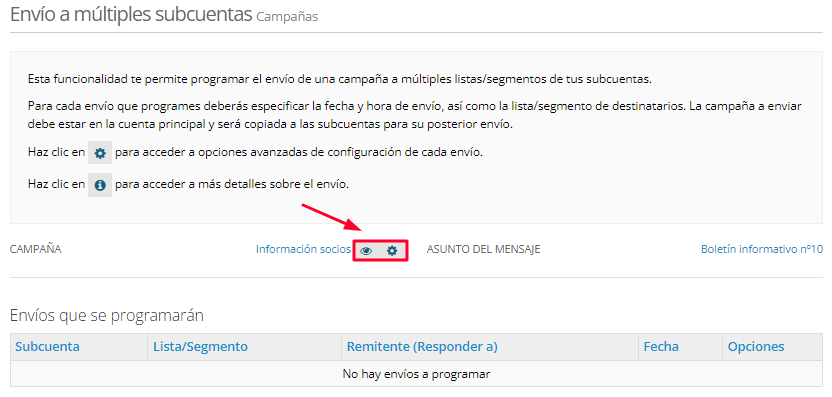
Once you have chosen the campaign, keep in mind that on the next screen you can change it if you made a mistake when choosing it in the initial step or if you finally decide to send a different one. To do this, you must click on the configuration wheel that appears next to the campaign name. You can also preview it if you click on “View”.

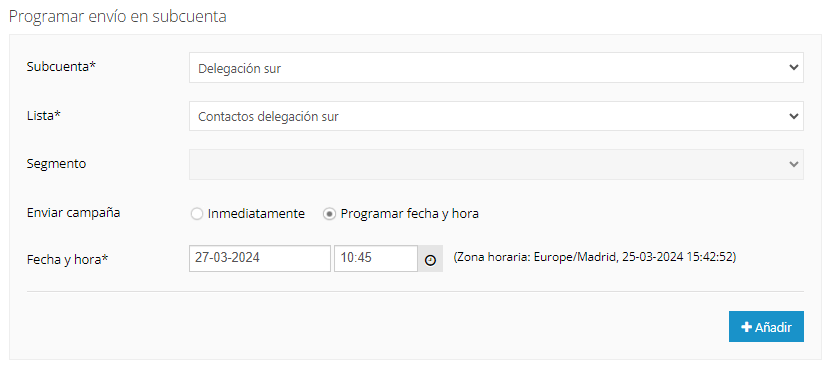
In the “Schedule sending to subaccount” section you can configure and schedule sending to the lists/segments of the subaccounts.
To do this, you must choose the corresponding subaccount, as well as the list or segment to send the campaign to. Next, check if you want to send at that time or if you want to schedule it for a specific date and time. Then click “Add”.

You must repeat the process for each of the lists/segments and subaccounts to which you want to send the campaign.
For each shipment you have configured, you will be able to view the information related to the subaccount and the list or segment, the subject, the sender, the language and the sending date by clicking on the “Information” button.
In addition, before sending or scheduling the sending, by clicking on the configuration wheels of each of them, you can edit the campaign subject, sender, language, sending date and time, add Google Analytics tracking and check the option to receive a copy of the campaign and a notification when the delivery is complete.

If you would like to delete one of the shipments, you can do so by clicking on the cross available in that same section.
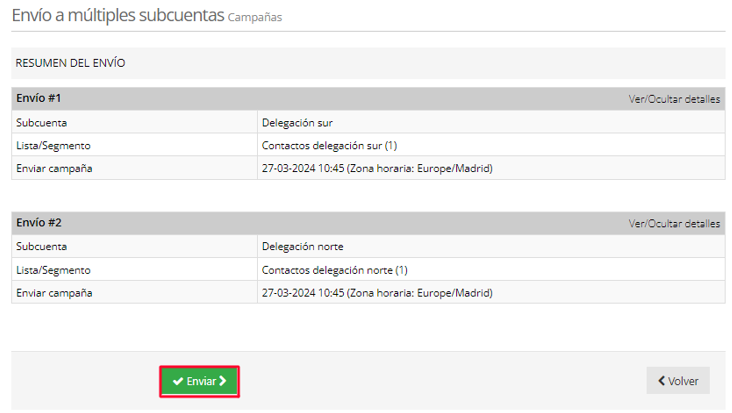
Once you have clicked on the “Next” button (if you do not want to make or schedule the shipment now, you can click on “Save” and continue at a later time) in the last step before making the shipment, you will be able to consult the summary of the different shipments.
To finish the sending process, click “Send”.

You can view the emails sends in the main account control panel (accessed from “Settings” – “Subaccounts”).

From this section, you can view the campaign and pause it. To delete it, you must access the corresponding account.
In each of the subaccounts, the campaign will have been copied in “Campaigns” – “Manage campaigns” and you will be able to consult the statistics in “Statistics” – “Campaign statistics” once the sending has started.
Emails sends will be scheduled in the time zone of the chosen subaccount.
It is not possible to send a campaign to the same list or segment twice.
Book a free demo
Our experts will advise you on the best Email Marketing solution for your business.